IT BRINGS OUR ATTENTION THAT SO MANY IPHONE STUCK AT APPLE LOGO RECENTLY WHILE SYSTEM UPDATED TO THE NEWEST IOS14 AUTOMATICALLY. IN THAT CASE, WE CAN NOT GUARANTEE THAT YOU WILL HAVE DATA SAVED. TOMAKE PHONE WORKS AGAIN, PLEASE SEE FOLLOWING STEPS.
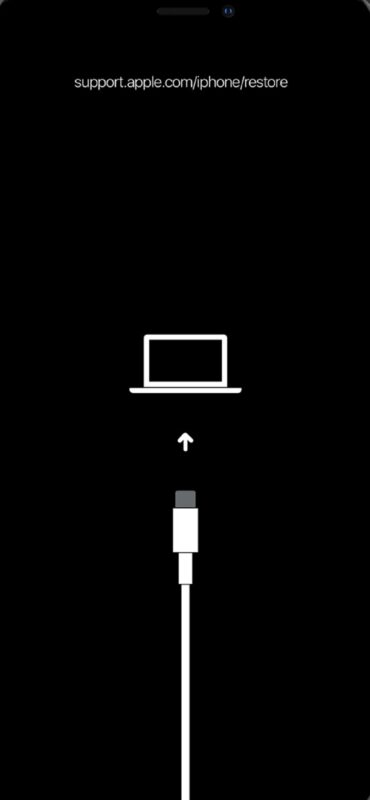
Is your iPhone stuck on the Apple logo screen after attempting to update iOS to the latest version? Or maybe you see the ‘connect to computer’ screen on the device? If considerable time has passed and the device is stuck on the Apple logo or connect to computer splash screen, there’s a fair chance that a failed update bricked your iPhone. But don’t panic, as this can be usually resolved with some troubleshooting and patience from your end.
Although updating the software on an iPhone or iPad is a pretty simple and straightforward procedure, things don’t always go as smoothly as it should sometimes. If an update fails, or gets interrupted for any reason, the device will typically not boot to the home screen. Instead, it’ll be stuck on the Apple logo screen or a black screen, never leaving that screen even if the device is let to sit for a long time. Fortunately, there’s more than just one way to try and resolve this issue.
If you’re one of those iOS or iPadOS users who were unfortunate enough to run into this issue, you’ve come to the right place. In this article, we’ll guide you through the necessary steps to fix your bricked iPhone or iPad.
How to Fix an iOS Update Bricked iPhone or iPad
Before you go ahead with the following step-by-step instructions, you’ll need to make sure you have access to a computer with iTunes installed. If you’re using a Mac running macOS Catalina or later, you can simply use Finder instead. It’s also a good idea to make sure you have a full iPhone or iPad backup ready, just in case things go wrong.
1. Force Reboot Your iPhone or iPad
We don’t need to get to the hard part just yet. First, let’s try force restarting your device and see if that fixes the issue. Keep in mind that a force reboot is different from a regular restart. We’re doing this just to make sure that your device is actually bricked and not just frozen or unresponsive.
If you’re using an iOS device with a physical home button, this can be done by simply holding the power button and home button simultaneously until you see the Apple logo on the screen.
If you’re using a newer iPhone or iPad with Face ID, you’ll need to click the volume up button first, followed by the volume down button, and then hold the side/power button until you see the Apple logo.
Regardless, after you have forcibly rebooted the iPhone or iPad, let it sit for a while to see if it will boot has expected. It’s not uncommon for a device to sit on the Apple logo for a few minutes sometimes, but if it’s been stuck on an Apple logo for an inordinately long time, like a half hour or more, then you may have a bigger problem.
2. Connect to iTunes or Finder, Update
Sometimes simply connecting the iPhone, iPad, or iPod touch to a computer and going through the updates on there is enough to resolve the issue. This is particularly true usually when the ‘connect to computer’ screen is what you see, rather than just an Apple logo.
- Connect the impacted iPhone, iPad, or iPod touch to a computer with a USB cable
- Open iTunes (Windows PC, and MacOS Mojave and earlier) or Finder (Catalina, Big Sur, and later), and choose “Update” – this may allow the device to complete the iOS update process
- If “Update” is not available or fails, choose “Restore” instead *
* Note restoring a device from backups can result in data loss. If there is no backup available to restore from, the device will be cleared and setup as new instead.
Sometimes even this process of updating and restoring fails, which then leads to the next option to use Recovery Mode.
3. Enter Recovery Mode
If you weren’t lucky enough to fix your device with a force reboot, or a regular update/restore, you’ll have to move on to the more advanced method here. Once again, you’ll be using a computer to recover your iPhone or iPad using iTunes or Finder. The steps to enter recovery mode may vary depending on the iPhone model you currently own.
- If you use an iPhone 8, or newer iPhones/iPads with Face ID: Press and quickly release the Volume Up button. Now, quickly press and release the Volume Down button. Then, press and hold the Power button until you see the recovery mode screen. You’ll have to do this in quick succession to get to the recovery mode screen.
- If you own older iPhones or iPads with Home button: Press and hold the Power and Volume Down buttons at the same time. Keep holding them until you see the recovery mode screen.
Once you’ve seen the above recovery mode screen, you’ll need to connect your iPhone to iTunes on your computer. If you’re on a Mac, you can use Finder to do the same. Your iPhone will now be detected in iTunes and you’ll be prompted to update or restore your device, as shown in the screenshot below.

Try updating your iPhone first and see if it fixes the issue. If the update fails, you’ll need to restore your iPhone.
Keep in mind that choosing Restore will erase all the data on your iPhone, but if you have an iCloud or iTunes backup, you can restore the backup on to your device.
There you go. You’ve most likely successfully fixed your bricked iPhone or iPad. Hopefully this wasn’t too challenging, and too much of a nuisance, though it can certainly be alarming when a device update goes wrong.
Apple’s iPhone 6 Plus smartphones are suffering from a hardware malfunction. If your iPhone 6 Plus has flickering gray bars at the top of the screen or unresponsive touch screen, you have Touch Disease.
The problem is caused by a design flaw in the iPhone 6 Plus, the phone is flexible and it bends pretty easily. The logic board is held firmly to the frame so whatever bending that takes place also flexes the logic board. Over time, this causes the touch controller to separate and lose contact with the main logic board.
There are two touch controllers on the iPhone 6 Plus, Meson (U2402) and Cumulus (U2401).

Meson (left) and Cumulus (right)
The only real cure to this problem is to remove the Meson chip using heat, then run a microjumper to the damaged M1 pad once the microjumper is in place the final step is to replace the Meson chip. Below is a picture that was taken at our workshop.

Unlike fixing a broken screen or replacing the battery, repairing the touch controller is not routine service. There aren’t a lot of repair services capable of fixing it. At Mobile King, we have repaired hundreds of these phones affected by this disease! We are one of the few in Australia that specialise in micro-soldering techniques with our state of the art repair equipment. If your phone has Touch Disease and would like to get your device repaired simply Request a Repair and we will get back to you with a quote.
Do you have met iPhone 6 Plus displays no IMEI when dialing *#06#. There is baseband firmware in “about iPhone” and iPhone keeps displaying “is searching ”. So, why is that? Mobile King answer for you.
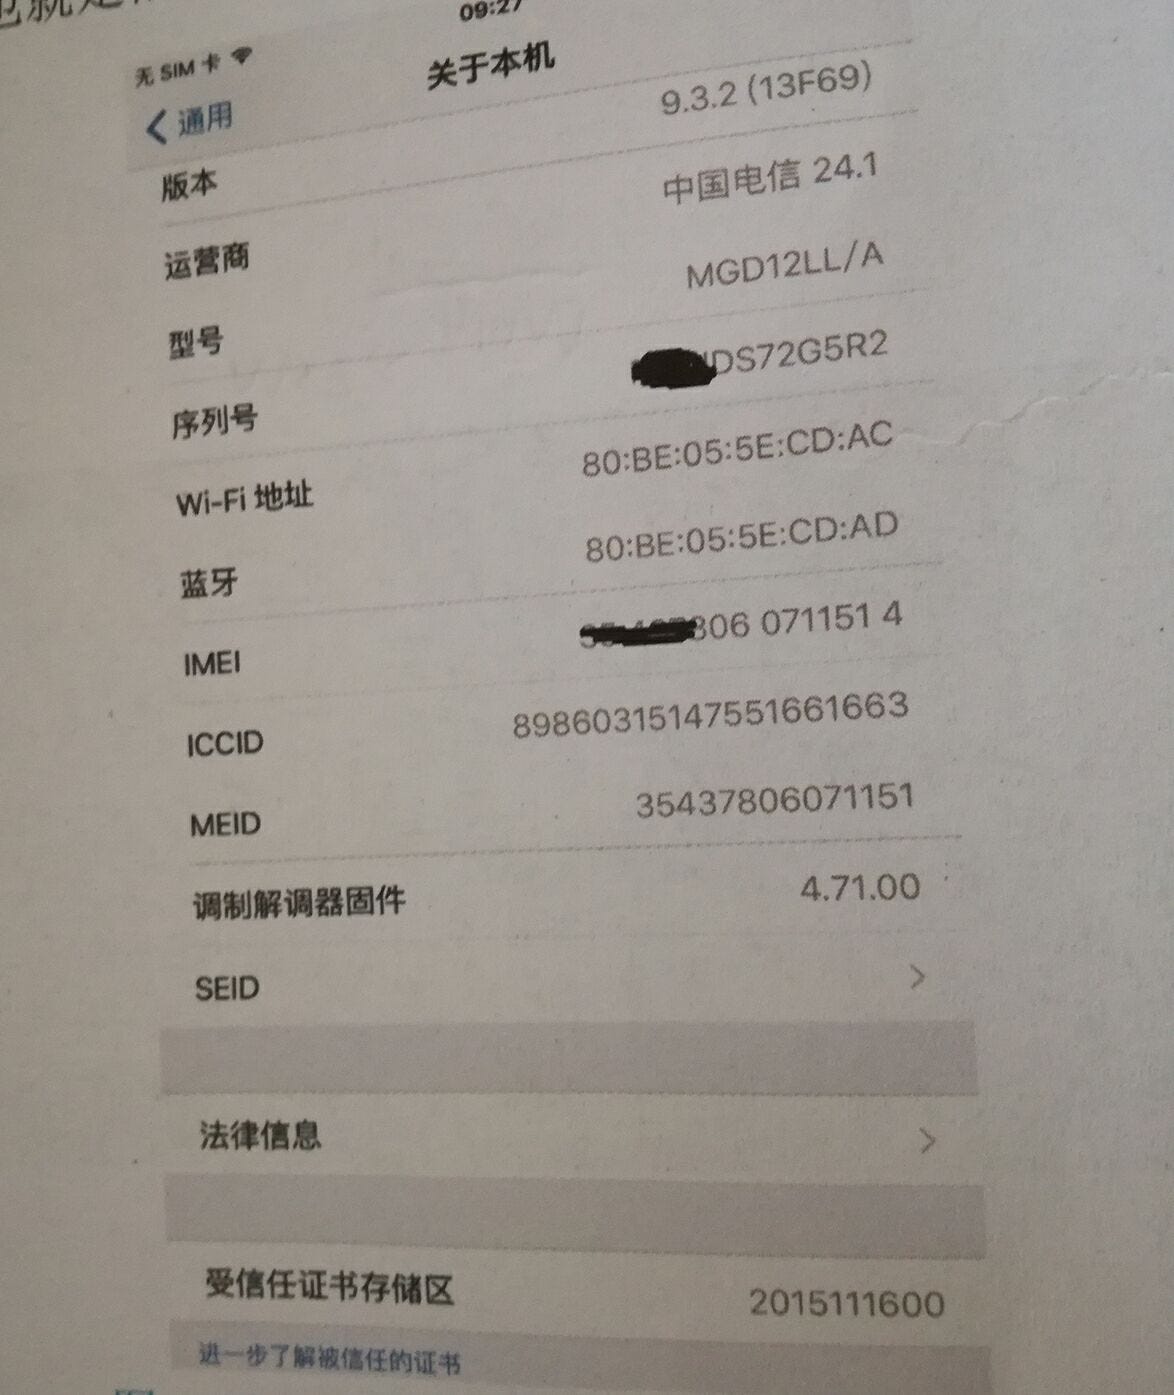
First assemble it to testing iPhone assembly and test. After power on, iPhone will display “no SIM card ” without inserting SIM card. If that happens, there is modem firmware in “about iPhone”(picture 1–1). That is to say, there is baseband.
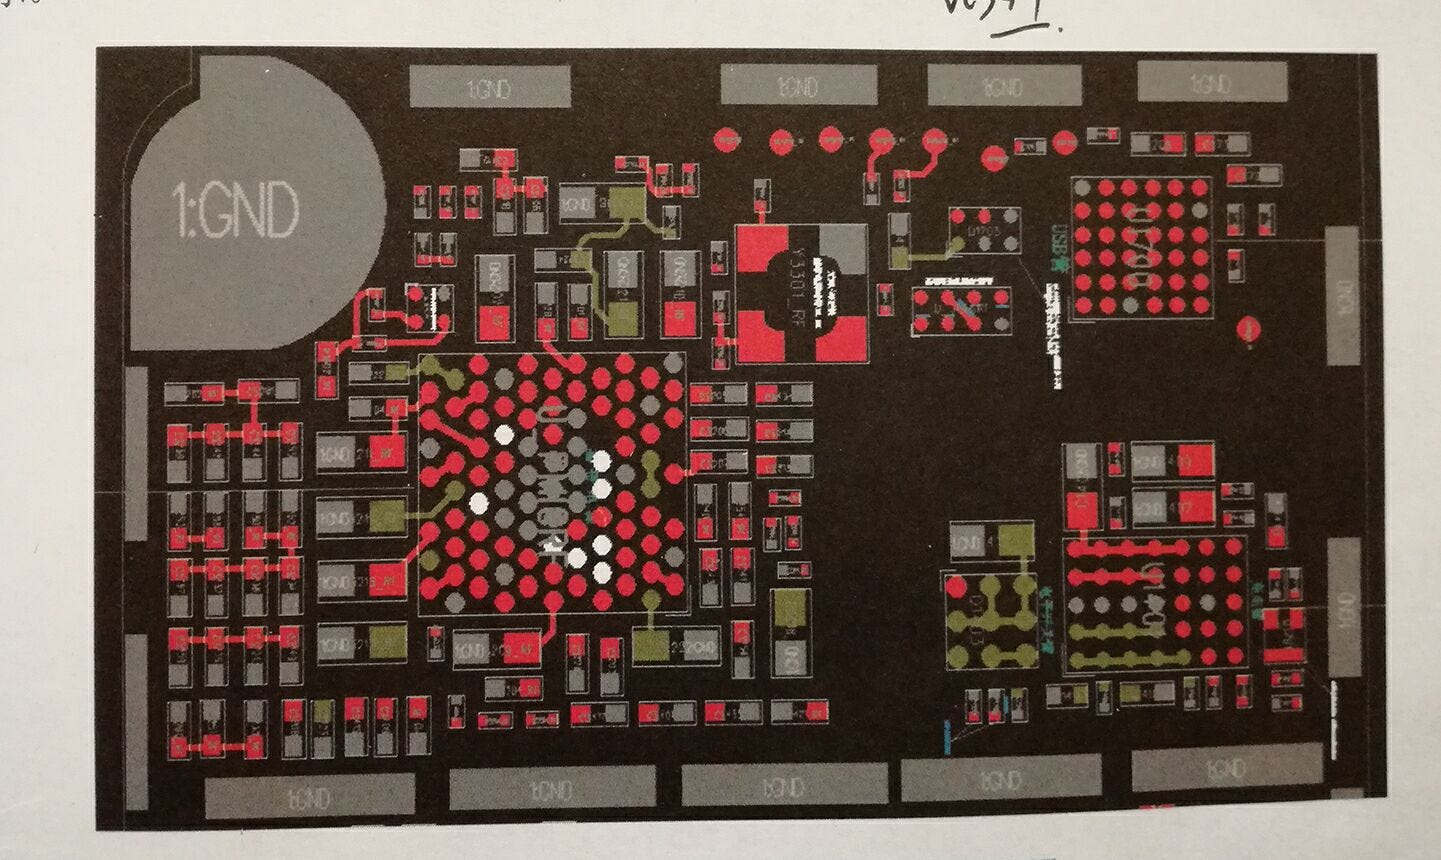
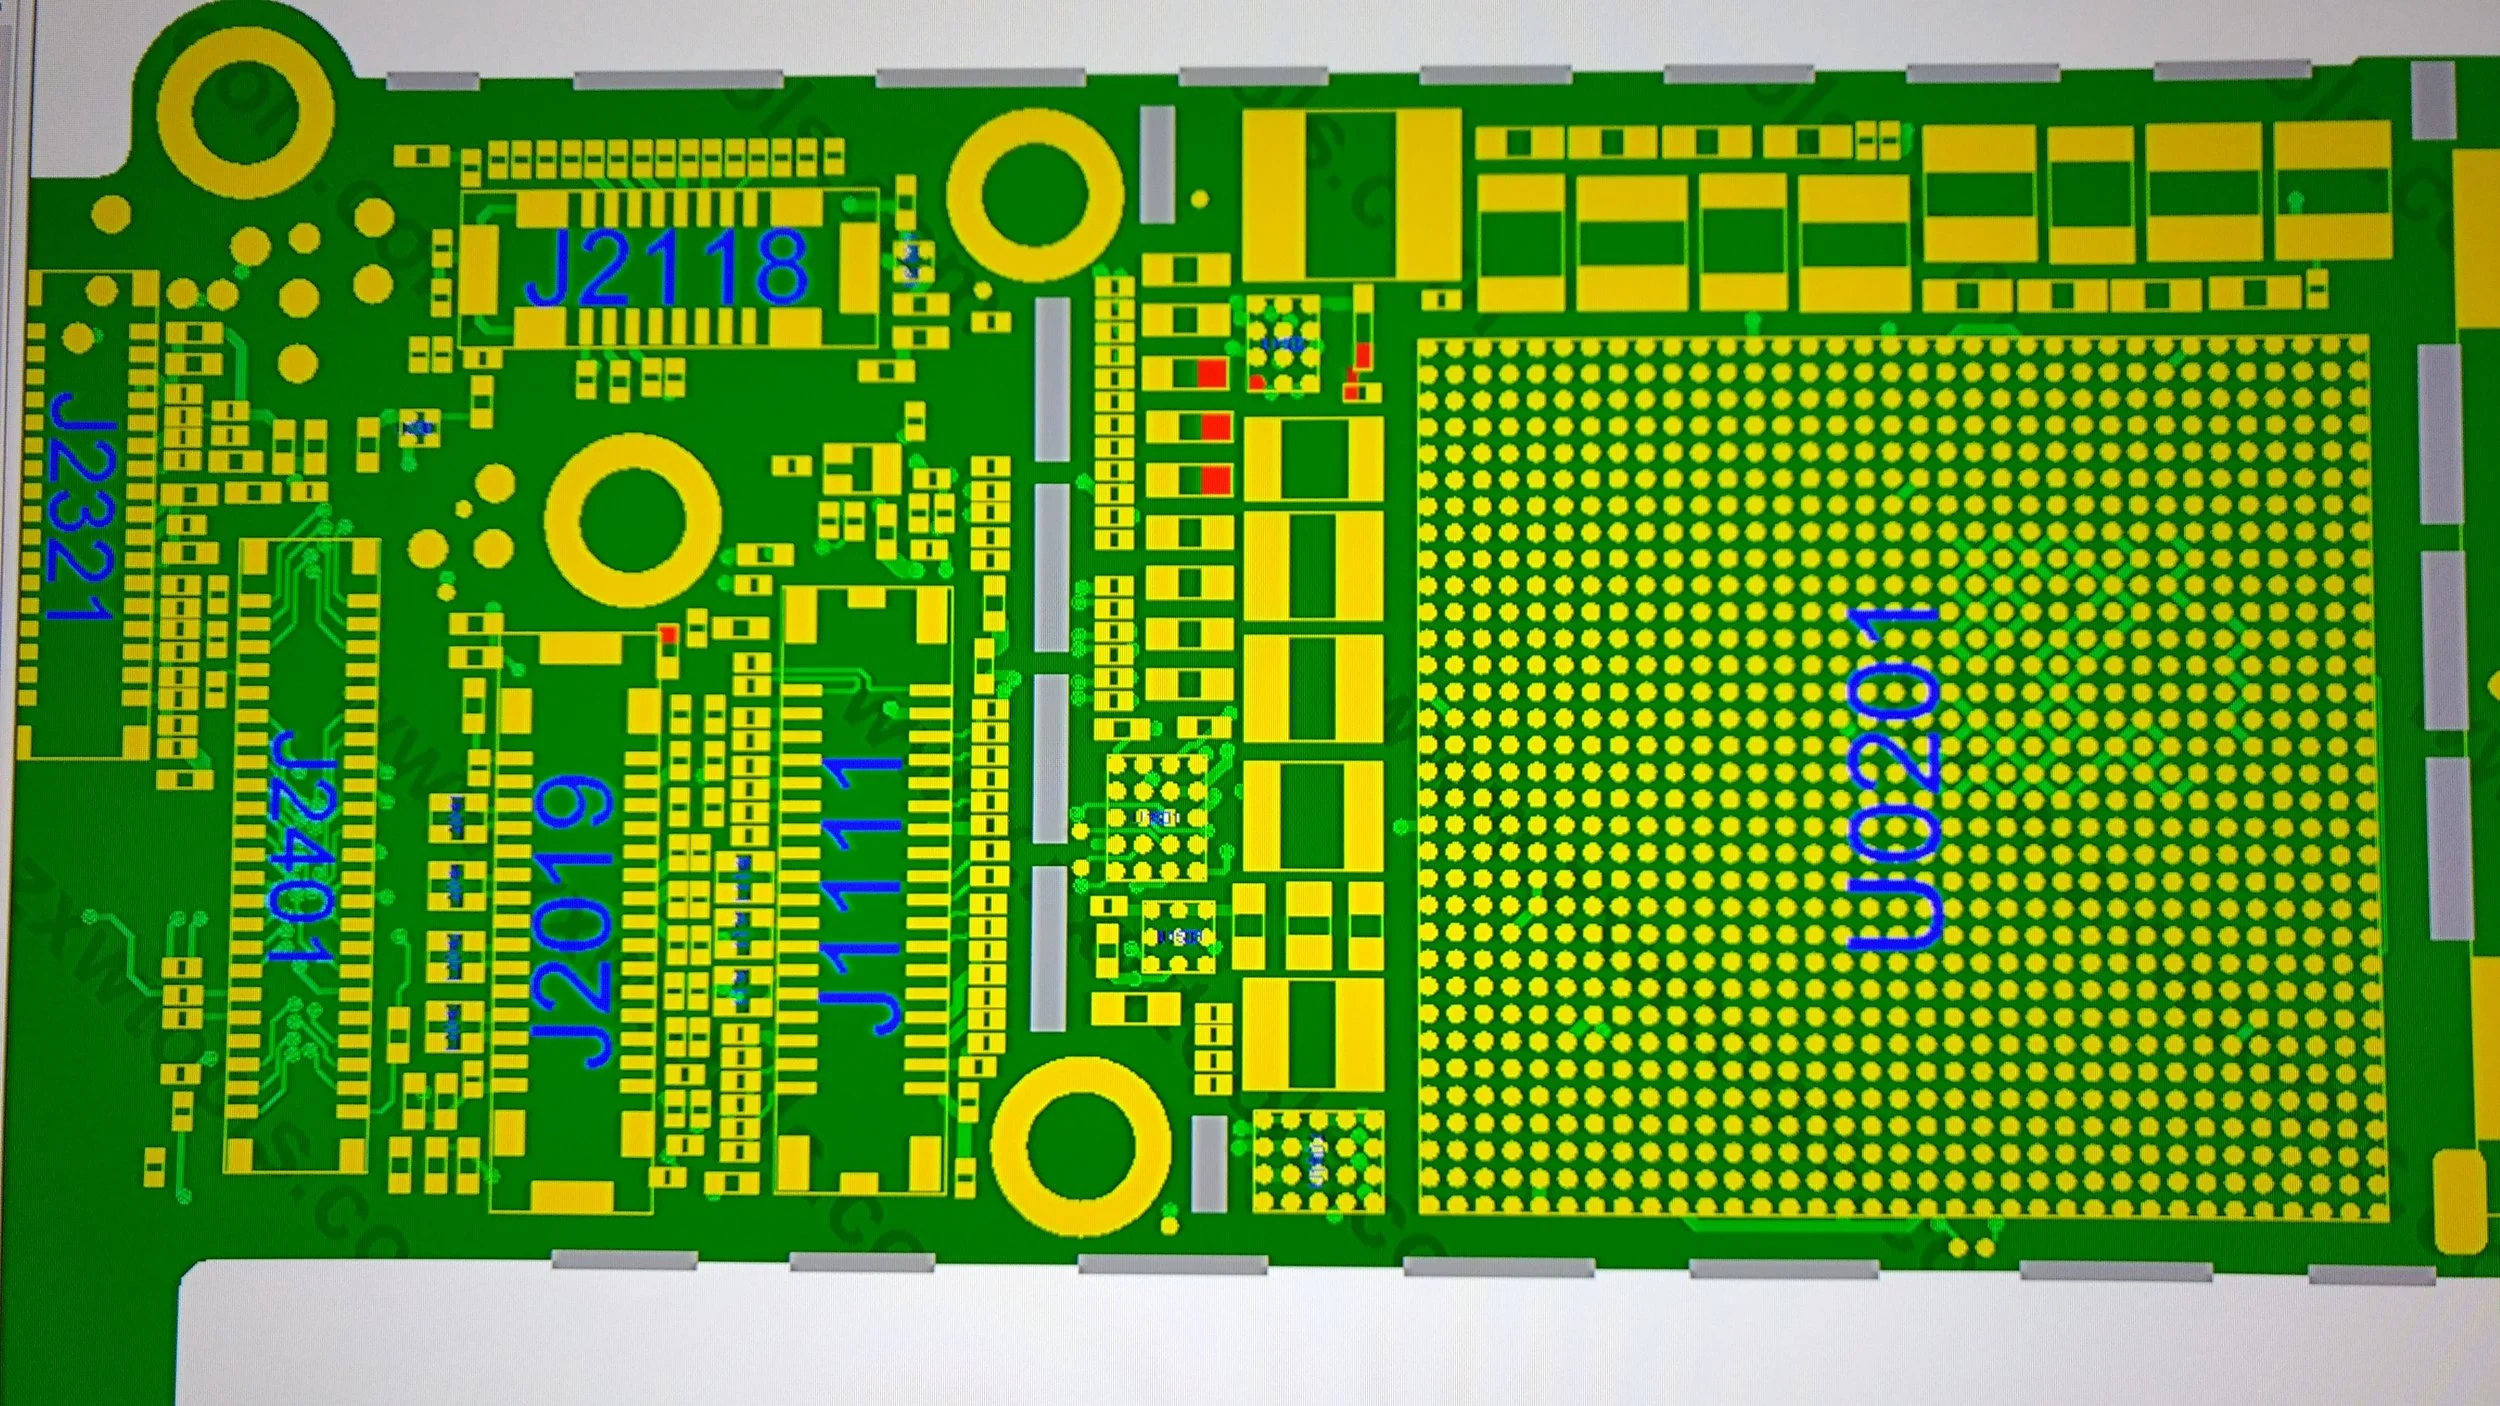
Then, numbers on the back of modem firmware suggests there is baseband CPU. There is not baseband, if without numbers. Input*#06# on the dial interface without inserting SIM card. If it is normal, the same IMEI in “about iPhone” will show up. If there is no response and IMEI after inputting*#06#, in addition, there is baseband firmware, so the problem cannot be caused by baseband. Displaying no IMEI after dialing *#06# is often caused by the two RFFE bus of baseband. There are four test points under NAND Flash , as shown in picture 1–2.
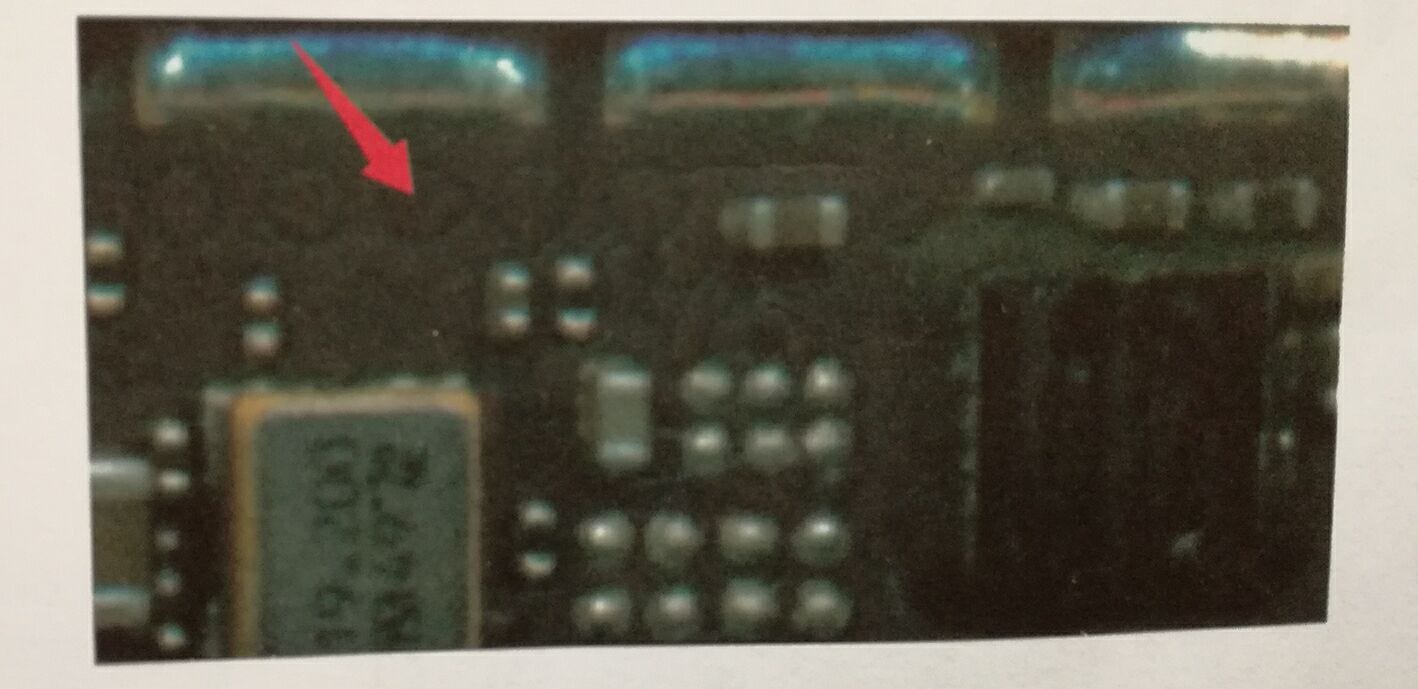
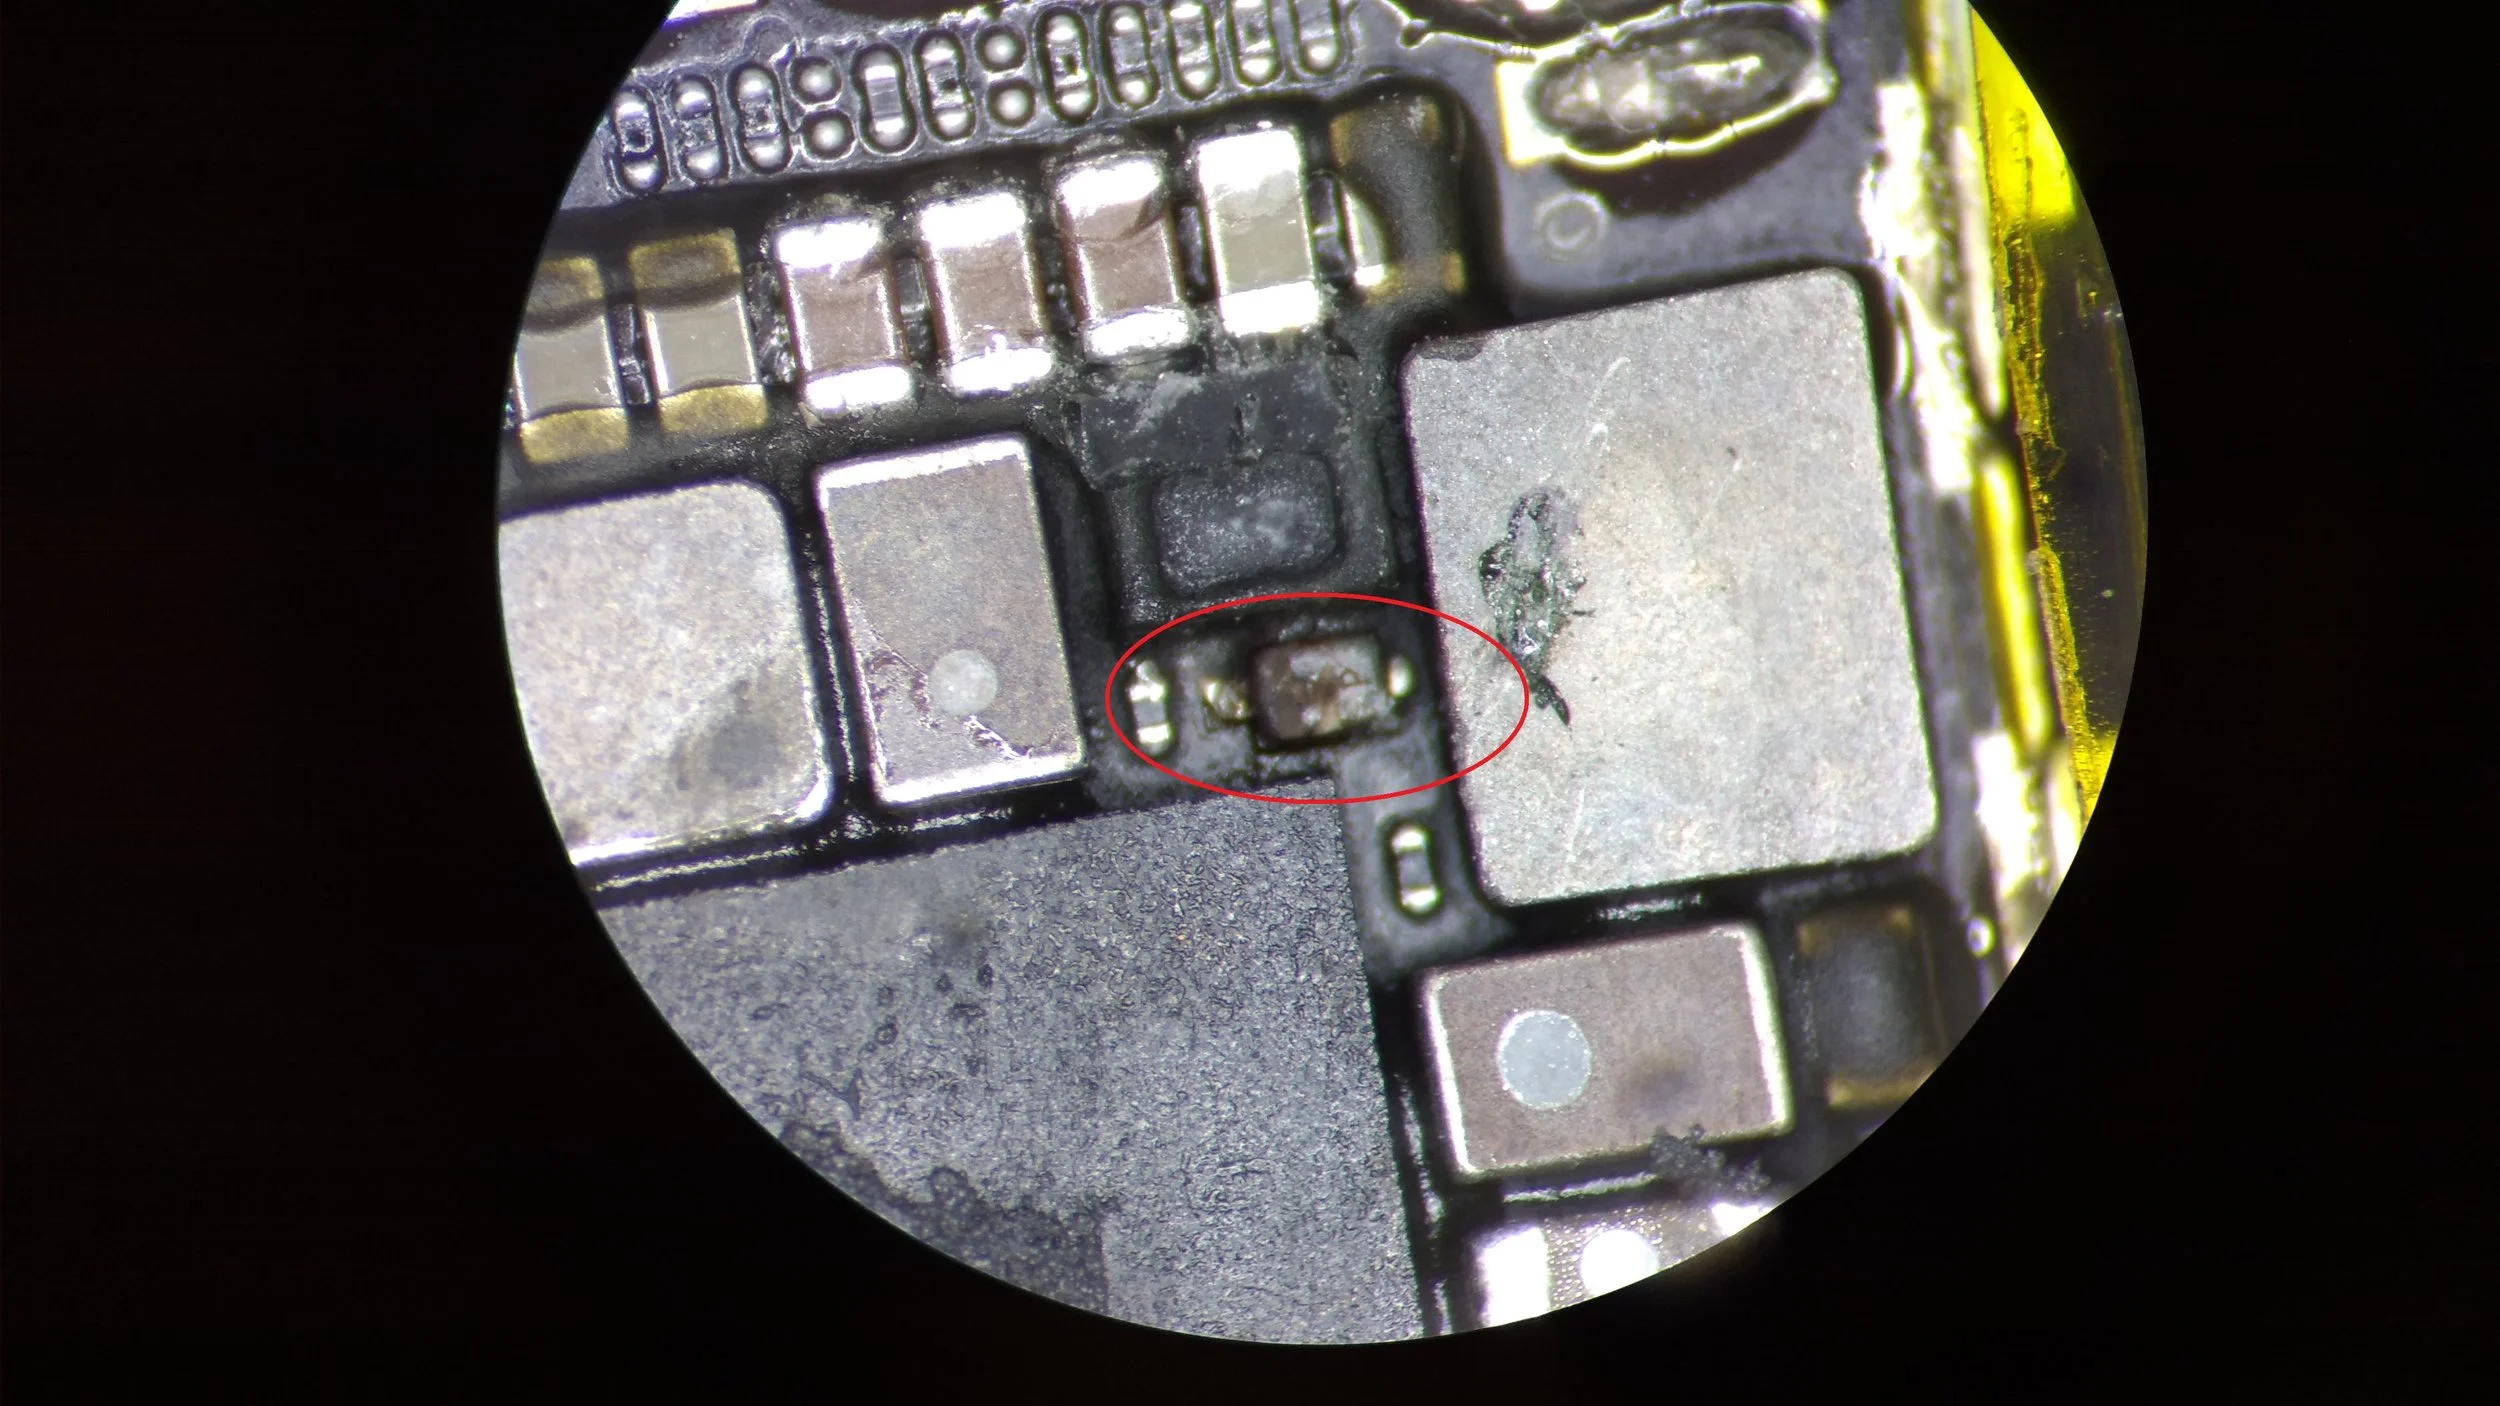
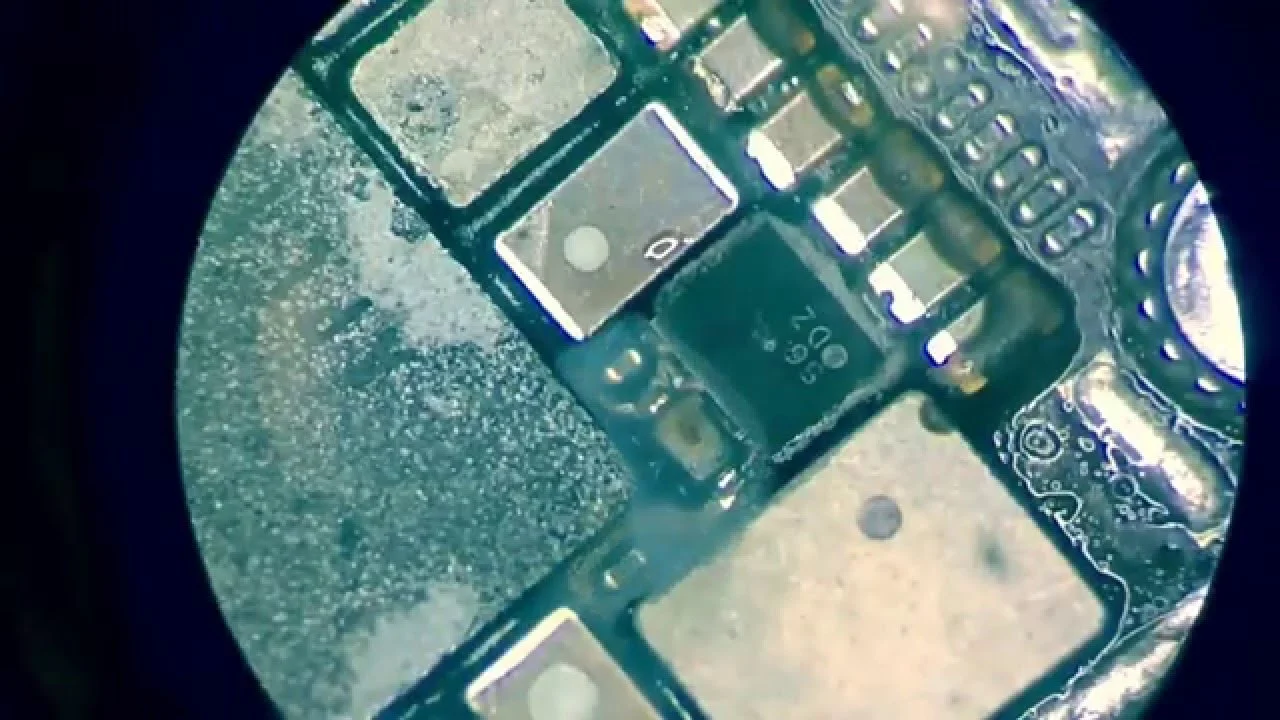
Furthermore, the four test points do not reveal any copper. Therefore, we need to use a pointed probe Multimeter to measure or scrape them. The normal diode data is between 300–400. But the RFFE2_CLK (picture 1–3) diode data is 750 which is seriously high. It is clear that RFFE2_CLK signal antenna is not normal. The diode data 750 comes from CPU. So the circuit breakage of baseband solder pad has been excluded. The normal diode data is about 400. The diode data of RFFE2 is from the DSM amplifier, and it probably caused by DSM amplifier’s U_DSM_RF pseudo soldering. The material object of DSM amplifier IC is shown in picture 1–4.
Last, reassemble DSM amplifier and measure the diode data of RFFE_CLK. Now the data is 380 that is normal. After power on, iPhone shows IMEI when dialing *#06#. Insert SIM card and the signal becomes normal, even for several days. Congratulation, the trouble is removed and your iPhone back to normal.
We’ve discovered a “signature fault” in the iPhone 7 series which results in no audio meaning no sound from the ear speakers, loud speakers or microphones. Occasionally this also triggers boot-loops, which is when the phone tries to turn on a fails the hardware check which causes the phone to reboot for an extended period of time.
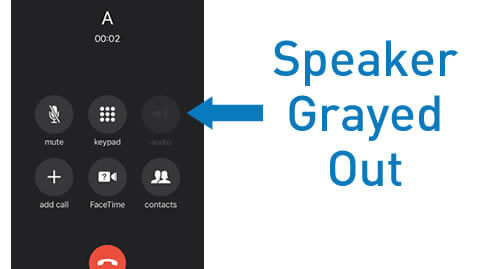
iPhone 7 no speaker icon
YOU MAY NOTICE ANY OR ALL OF THE FOLLOWING LIST OF SYMPTOMS:
Callers can’t hear you
Voice memos are grayed out
Sound doesn’t record on videos
Siri can’t hear you
You hear static on calls
Voice record button doesn’t work
Speakerphone doesn’t work
Phone takes a very long time to boot
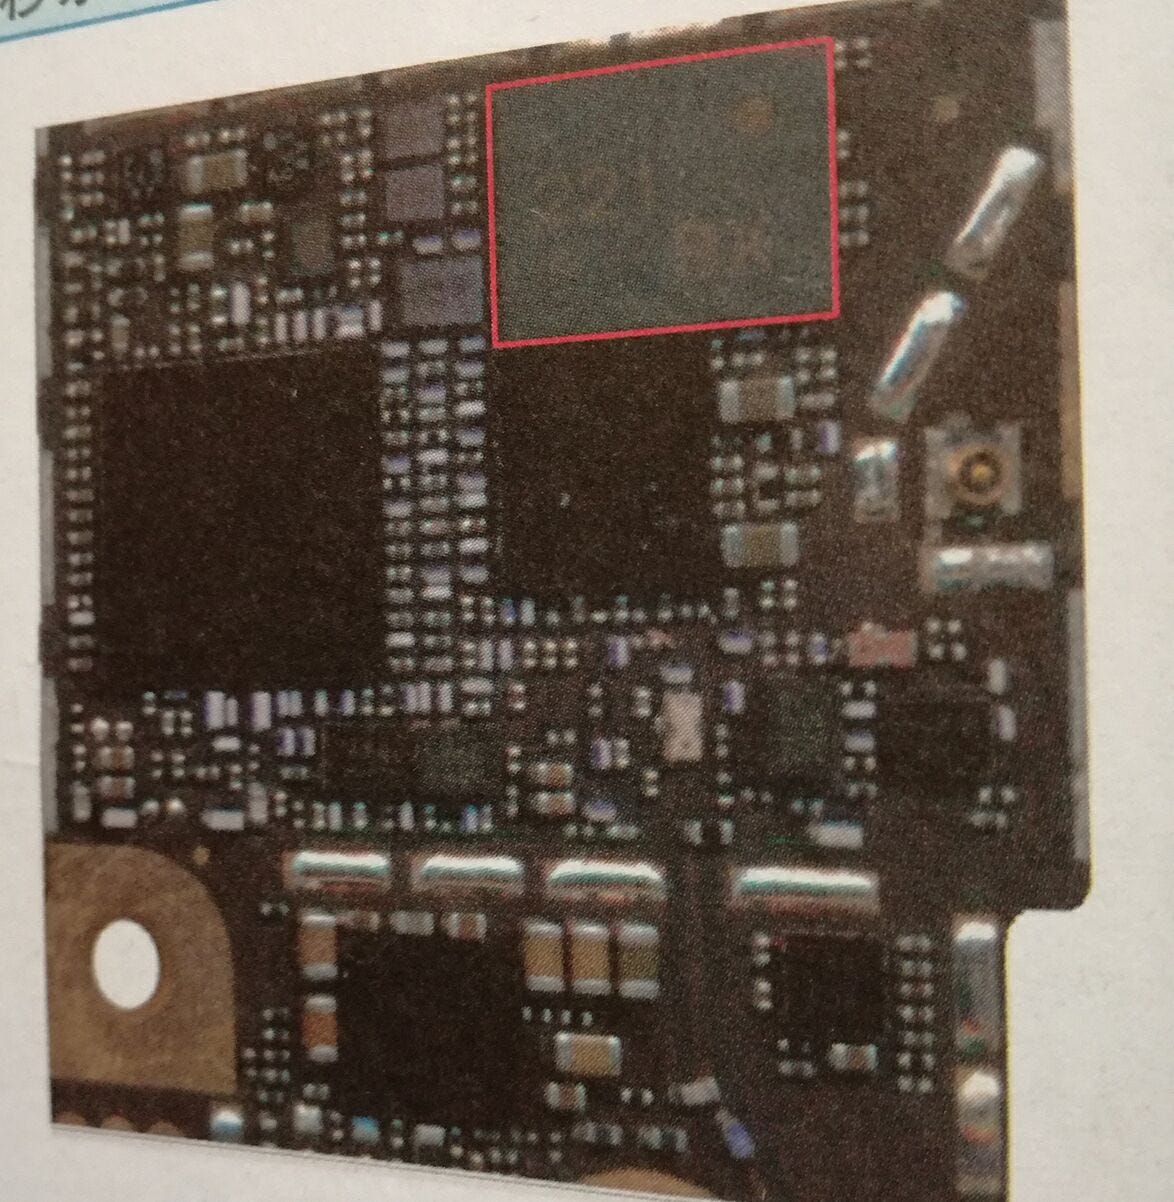
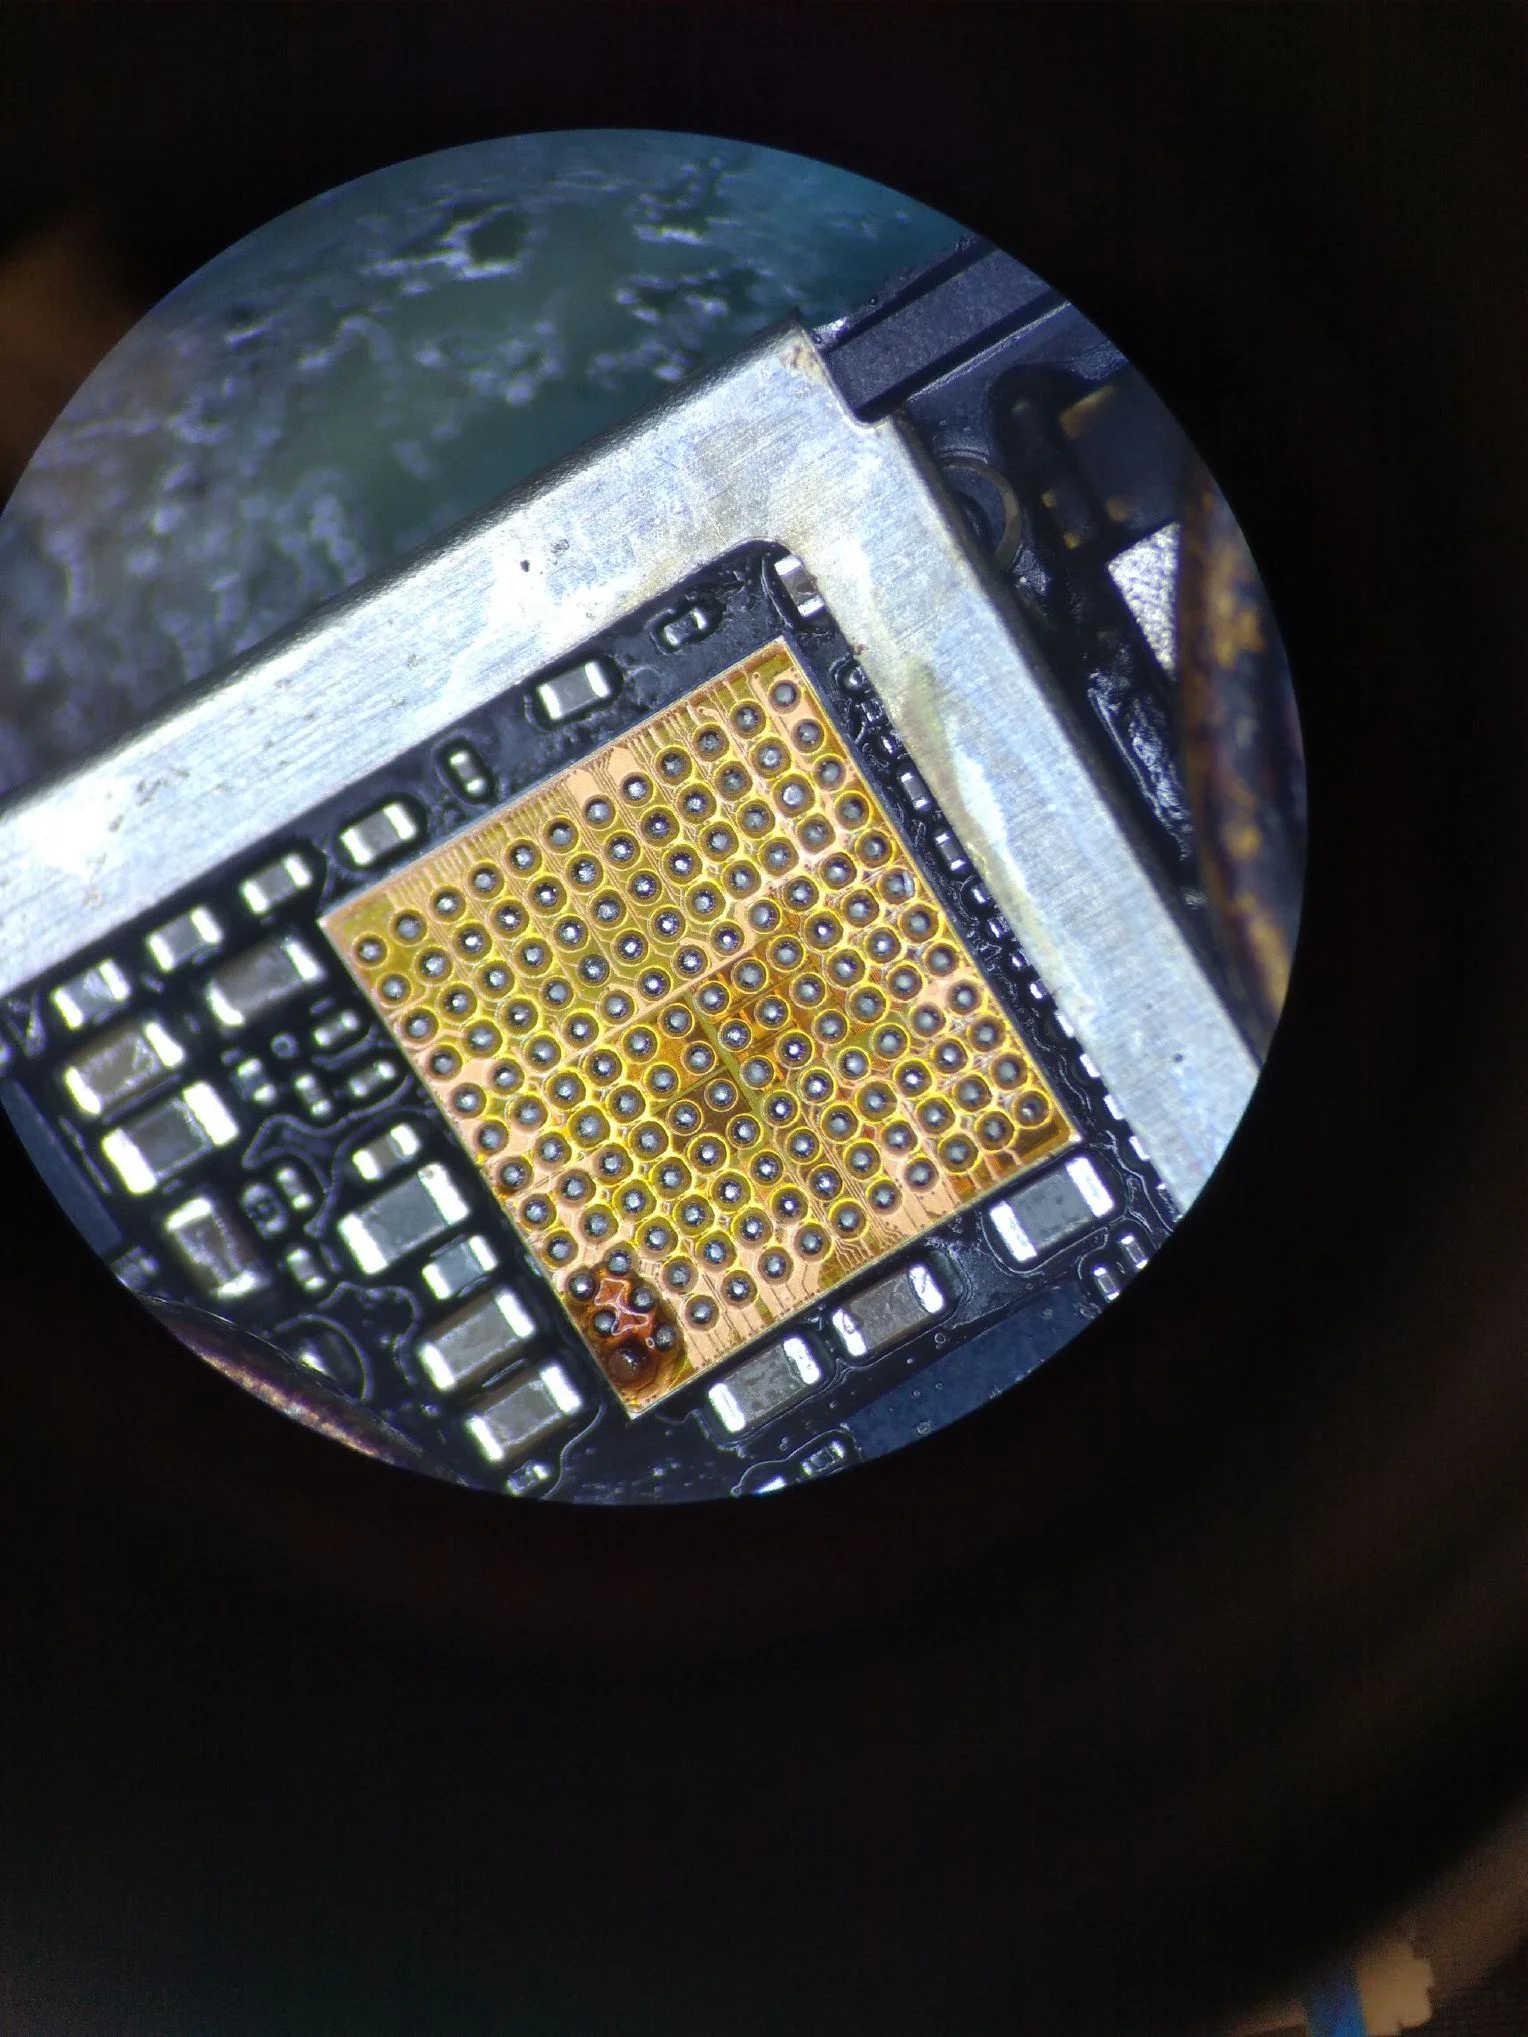
When installing the new Audio IC it is imperative to add a jumper to the C12 pad beneath the chip so that the faulty connection will be intact.
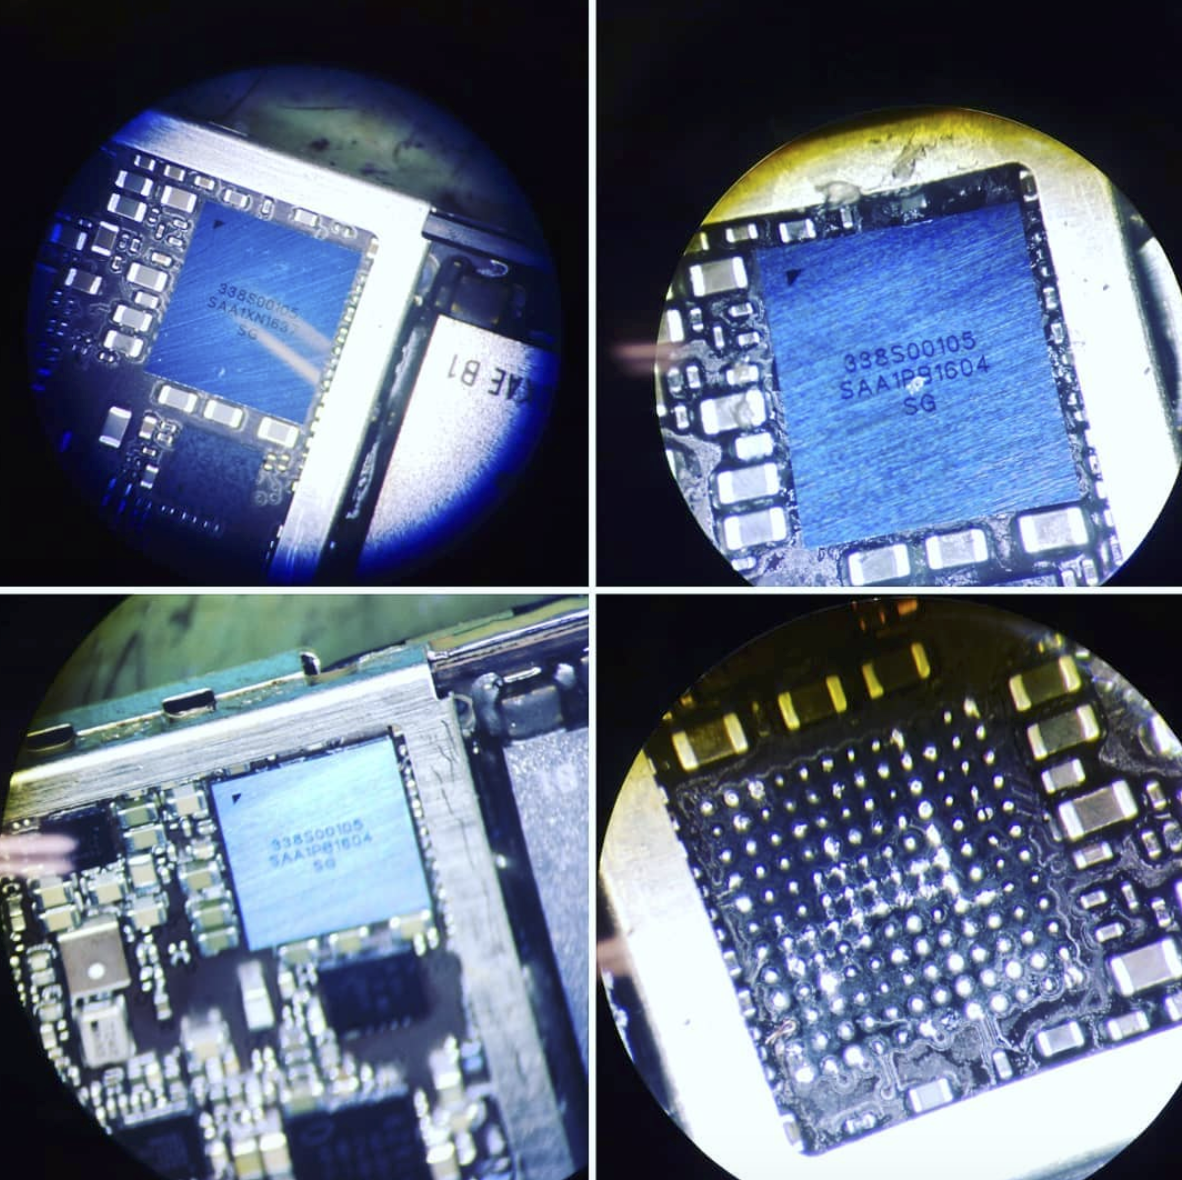
As part of the install for the jumper between pad c12 and the adjacent component it’s important to make sure the proper placement of the very thin wire. We can confirm the proper placement by taking the same chip and flipping it atop the newly installed ic and aligning the chip to see the BGA (ball grid array) under the ic. This almost allows us to “see through” the chip. Once we confirm the proper connections we can re-assemble the motherboard and test the phone.
With more than ten years of experience, we have experienced from 2nd generation of the iPhone to the current 11th generation, and we have witnessed various problems with the iPhone motherboard. Almost every generation has their problems, and this problem will increase over time even without physical damaged. Let’s see what their problems are.
- iPhone 4/4s – wifi grey out
- iPhone 5- Tristar IC (U2) Issue (not charging or charge up, phone die out much quicker than usual)
- iPhone 5S- Blue/Red screen, keep reboots
- iPhone 6/6P-Touch disease (screen freeze, not touchable), Only Searching or No IMEI (unable to read sim card)
- iPhone 6s/6sP- WTR_RT issue (signal weak), Backlight (half screen turn to very dark)
- iPhone 7/7P- Audio IC issue (no audio whenever making a phone call) and Baseband PMU short (no IMEI, no signal)
- iPhone 8/8P-Rainbow logic board, specially MRS, PC-V0 and H3K5 board, break so easily-no reparable or not worth to repair
- iPhone X onwards- so many issues as Logic board part and Baseband part are separately. Common issue may result no touch, no signal, not charging etc.
This is a typical repair service we offer at Mobile King
A blown back light on an iPhone 6 is typically caused by a screen replacement gone wrong or a sudden drop on the phone which can damage some of the components on the backlight circuit.
Lets take a look at the back light circuit and evaluate the possible issues and solutions to this problem.
iPhone 6 Backlight circuit
The backlight circuit on the iPhone 6 mostly consist of 3 capacitors (C1530, C1531, C1505) A diode (D1501) 3 filters, (FL2024, FL2025, FL2026) as well as a backlight driver (IC) U1502
Typically on an iPhone 6 with no backlight that needs repair, the first thing to check is the 3 capacitors to check if they are shorted to ground, this is a common problem with capacitors and can be easily replaced with a hot air station or a pair of hot tweezers. The capacitors are 2.2μ F in value and have a 0402 package size.

If the capacitors are not shorted to ground then you should look to other components to see any obvious signs of problems.
iPhone 6 D1501 Diode burnt
Above we can see the left side (negative) of the diode has burnt which is typically a sign of something else in the circuit that has shorted and/or failed causing the diode to smoke and burn.
iPhone 6 diode backlight smoking
If we were to replace the diode and connect the board to power it would most likely burn again. The diode burning is only a sign of some other problem.
After checking and/or replacing the other components in the backlight circuit the next culprit can be the backlight driver (U1502) which controls the whole circuit. This integrated circuit is a BGA IC which has underfill (glue) around the chip. Once the glue has been removed and scraped away it can be heated with a hot air station to melt the solder balls under the chip.

Backlight display driver IC U1502 – Removed
Backlight display driver IC U1502 – Replaced
After replacing the Backlight Driver IC we no longer have a short to ground on the circuit which restored the back-light on the iPhone 6.
If you need this iPhone 6 repair service then you can stop in our shop
Standard repairs such as iPhone cracked/damaged screens are usually completed within an hour. More complicated repairs do take longer depending on hardware availability or other issues involved.
For iPhone, there is 99% of chance that your data will be safe. For the complicated problems, we try to make every effort to keep it intact, however we cannot guarantee the safety of your data. The reason is that often it is outside of your control and the data may already be lost before we examine the device. Therefore, we recommend you back up your data regularly if possible.
Repairing liquid damage is often the most complicated and time consuming that can be repair to a mobile phone. Therefore, we are not attempting to repair liquid damage due to the risks of failure and increased risk of further problems over time.
Data recovery is the process of salvaging data from a device that has no power, been corrupted or lost. Rest assured Mobile King are the experts at retrieving lost data.

HOW WE RECOVER YOUR DATA:
This will differ for every phone however we usually have to perform a selection of repairs to first be able to access the data.
- Before the data can be extracted we need to get the correct memory IC’s functioning
- Where needed, we may need to replace the charging connector for a successful data transfer
- Replacement of one or many of the key components needed for power

WHEN WE SUCCESSFULLY RECOVER YOUR DATA, WHAT DO WE DO WITH IT?
Whatever solution is most convenient to you we can accommodate.

Physical damage occurs when a device has experienced some form of trauma.
THE MOST COMMON TYPES OF PHYSICAL DAMAGE ARE:
- Touchpad / glass cracked
- LCD screen broken
- Housing bent or dented
- Charging connectors / pins damaged

WHAT TO DO TO INCREASE YOUR CHANCES OF A SUCCESSFUL REPAIR:
- Do not attempt to repair the device yourself
- Bring all pieces of your broken device into Mobile King
- Always tell a Mobile King staff member how the damage actually occurred
- Keep the damaged device away from any moisture
Batteries not holding charge is one of the most common faults found with phones and tablets. There can be multiple reasons why your battery does not last as long anymore. Rest assured, Mobile King can have you back in action quickly.
TYPICAL CAUSES OF BATTERIES NOT HOLDING CHARGE:
- Like all batteries, your device battery will have a specific charge and discharge rate that will expire as time goes on
- Leaving your phone on while charging can put stress on the battery cells causing them to wear down over time
- Specific apps are known to drain your battery quickly
- Your phone may have suffered unknown physical or liquid damage
Smartphone batteries have a lifespan of between 300-500 charging cycles,
which equates to roughly 12 months of standard usage.

WHAT TO DO TO HELP YOUR BATTERY LAST LONGER:
- Turn off Bluetooth and Wi-Fi if you’re not using them
- Reduce your screen brightness
- Disable live wallpapers
- Turn off your location / location services
- Limit your screen timeout
- Turn off vibration
MYTH BUSTERS:
- You don’t have to let you battery drain to 0% before charging it again. New lithium-ion batteries are best kept between 40% and 80%.
- Leaving your device charging overnight does NOT reduce the battery lifespan. Once fully charged, the device switches to “trickle charge” mode which has a minimal impact on the battery.
HOW WE ASSESS AFFECTED DEVICES:
- Current draw (power usage) on the phone
- Charging ports
- Battery quality
- Software issues
- Liquid damage
- Physical damage
- Damage to PCB (short circuit)

When it comes to the power of a phone literally anything can impact whether it will function correctly or not. Our technicians have a selection of equipment and years of experience that can very quickly narrow down the most likely cause and allow us to provide you with a quote on the spot.
TYPICAL CAUSES OF DEVICES NOT POWERING ON:
- Liquid damage
- Power button
- Charging ports
- Battery quality
- Software issues
- Physical damage
- Damage to PCB (short circuit)
WHAT TO DO TO INCREASE YOUR CHANCES OF A SUCCESSFUL REPAIR:
- Leave the phone off
- Avoid plugging it into chargers as a short circuit could fry your internal board
- Tell our technician whether the phone has been previously repaired, been in contact with liquid, dropped or has any potential software issues
- Avoid any further damage and let the experts at Mobile King diagnose the exact fault for you
Liquid or “water damage” is the introduction of a liquid substance internally or externally on a device which will attack componentry vital to the successful operation of the phone or tablet.
What liquid can harm a phone or tablet?
- Water
- Sea water
- Alcohol
- Perfume
- Even humidity or steam!
If your device has suffered liquid damage, follow our step-by-step guide: Saving Liquid Damaged Devices.
The following information is helpful to us when you drop off your liquid damaged device:
- What type of liquid has the device been exposed to?
- How long ago was the damage done?
- Did you turn off the phone when it happened?
- How long til you turned it back on?
- Have you taken any steps to try and fix the phone since the damage?
- What symptoms have you had since then?
- Has the phone been repaired previously? What was the damage? When?
CAN IT BE FIXED?
Absolutely! Mobile King’s qualified technicians are experts at recovering liquid damaged phones. Our success rate depends on the type of liquid spilt on the device, the time since the accident and what precautions you have taken prior to bringing it to us.
Need help identifying which model of iPhone or iPad you have? Please use the following guide to confirm which model you have. All iPhone and iPad models start with the letter “A” followed by four numbers. Once you know your model number, you can look it up on the table below. Easy!
Method 1 – Look in Settings
Go to Settings > General > About. To the right of Model, you’ll see the part number. To see the model number, tap the number shown in the picture.

Method 2 – Look on your device
If you can’t check your settings because the phone is locked, or the screen is broken, you can check on the device itself. On recent iPhones (iPhone 8 and above) the model number is visible inside the SIM card slot. You’ll need to remove the SIM card to view the model. The model number is on the upper side—the side with the display. You may need a bright light and your glasses – the writing is pretty small!

On an iPhone 7 or earlier – or on an iPad – find the model number on the back of your device.

iPhone Model | iPhone Model Number(s) |
|---|---|
iPhone 5 | A1428, A1429, A1442 |
iPhone 5c | A1456, A1507, A1516, A1529, A1532 |
iPhone 5s | A1453, A1457, A1518, A1528, A1530, A1533 |
iPhone SE | A1723, A1662, A1724 |
iPhone 6 | A1549, A1586, A1589 |
iPhone 6 Plus | A1522, A1524, A1593 |
iPhone 6s | A1633, A1688, A1700 |
iPhone 6s Plus | A1634, A1687, A1699 |
iPhone 7 | A1660, A1778 |
iPhone 7 Plus | A1661, A1784, A1785 |
iPhone 8 | A1863, A1905 |
iPhone 8 Plus | A1864, A1897 |
iPhone XR | A1984, A2105 |
iPhone X | A1865, A1901 |
iPhone XS | A1920, A2097 |
iPhone 11 | A2221 |
iPhone 11 Pro | A2215 |
iPhone 11 Pro Max | A2218 |
iPad Model | iPad Model Number(s) |
|---|---|
iPad Pro 10.5″ | A1701, A1709 |
iPad Pro 9.7″ | A1673, A1674, A1675 |
iPad Air 3 | A2152, A2123, A2153 |
iPad Air 2 | A1566, A1567 |
iPad Air | A1474, A1475, A1476 |
iPad Mini 4 | A1538, A1550 |
iPad Mini 3 | A1599, A1600 |
iPad Mini 2 | A1489, A1490, A1491 |
iPad Mini | A1432, A1454, A1455 |
iPad 7 | A2197, A2200, A2198 |
iPad 6 | A1893, A1954 |
iPad 5 | A1822, A1823 |
iPad 4 | A1458, A1459, A1460 |
iPad 3 | A1416, A1430, A1403 |
iPad 2 | A1395, A1396, A1397 |
iPad | A1219, A1337 |
With more than ten years of experience, we have experienced from 2nd generation of the iPhone to the current 11th generation, and we have witnessed various problems with the iPhone motherboard. Almost every generation has their problems, and this problem will increase over time even without physical damaged. Let’s see what their problems are.
- iPhone 4/4s – wifi grey out
- iPhone 5- Tristar IC (U2) Issue (not charging or charge up, phone die out much quicker than usual)
- iPhone 5S- Blue/Red screen, keep reboots
- iPhone 6/6P-Touch disease (screen freeze, not touchable), Only Searching or No IMEI (unable to read sim card)
- iPhone 6s/6sP- WTR_RT issue (signal weak), Backlight (half screen turn to very dark)
- iPhone 7/7P- Audio IC issue (no audio whenever making a phone call) and Baseband PMU short (no IMEI, no signal)
- iPhone 8/8P-Rainbow logic board, specially MRS, PC-V0 and H3K5 board, break so easily-no reparable or not worth to repair
- iPhone X onwards- so many issues as Logic board part and Baseband part are separately. Common issue may result no touch, no signal, not charging etc.
As a facial-recognition technology initially launched on iPhone X, Face ID has been applied to latest iPhones, including iPhone XS,XS Max and XR. With this amazing Face ID system, users can unlock their devices by scanning and confirming facial identity. Whether you are wearing a hat, putting on glasses or you are in the dark.

There are 8 components packed into the front of the phone.
Infrared Camera
Flood Illuminator
Proximity Sensor
Ambient Light Sensor
Speaker
Microphone
Front Camera
Dot Projector
The infrared camera, the dot projector and the front camera are located on the back glass assembly. The flood illuminator, the proximity sensor, the ambient light sensor, the speaker and the microphone are located on the display assembly. Please be careful when disassembling or repairing the phone. Damage of any component will cause Face ID failure.
Next, we will disassemble the flood illuminator module and the dot projector and find out the reason why Face ID can be so easily damaged.

Let’s disassemble the flood illuminator module first. Pry open the glass cover with a blade. We can see that there are many holes on the flood illuminator that are arranged in a matrix of 11×11. The chip is connected to the circuit board with the help of gold wires. Once water damaged, these holes can be blocked. And you will be faced up with Face ID failure.
Let’s continue!

Chip 1 is an unencrypted chip. Since some repair technicians have replaced it before, our guess is that chip 1 might be a boost chip or an EEPROM chip. So chip 2, chip 3, or chip 4 might be the encrypted chip. Still, due to the difficulty of replacing, no one has verified that. As you can see, with thousands of components integrated, the composition of the flood illuminator module is very precise. Chip 2 is the flood illuminator. Chip 3 and Chip 4 are proximity sensors that are responsible for receiving and transmitting respectively. The infrared light emitted from the two proximity sensors could be a single dot or a single set of dots. Independent of each other, the three chips are indispensable. And this is what you should know about the flood illuminator module. Let’s move on to the dot projector.
The camera parts of iPhone X work in the same way as front cameras of other iPhone series. Now we will focus on the dot projector. The outer layer of the dot projector is sealed with resin and protected by metal welding techniques. Pay attention to these welding points.

They can easily fall off once the phone is dropped. And once off, they cannot be restored. When disassembling, we need to cut open the outer metal cover at first. Then heat with the Hot Air Gun and remove the resin with tweezers. Once the dot projector has been detached, we can see a crystal that looks just like a diamond lens. The infrared light is emitted from here. Then reflected by the crystal. Its projection range is determined by the lens afterwards.

Pry open the crystal, here we can see the complete internal structure of the dot projector.

The chip on the left is used to store data, whereas the chip on the right side acts just like a projector. We can see that there are thousands of dots arranged here. The infrared light is emitted from here. Since necessary power supply is needed for chip on the right side to work normally, once water damaged, circuits here are most likely to get short. Which can also result in Face ID not working. And please be noted that the chip is exposed without black adhesive seal. So it can be easily damaged once water-damaged or dropped. What’s more, it also can not be restored once damaged. And this is the internal structure of the dot projector. Let’s continue with the crystal part of the dot projector.

We can see that there is a concave lens and a convex lens on the crystal. And the two are made of glass. Once dropped, Face ID can also be affected.
Judging by what we have learned during the disassembling, main circuits of the Face ID are exposed. Once water damaged or exposed to a relatively humid environment, there might be electricity leakage or short-circuit problem that can result in Face ID failure. What’s more, most of the Face ID parts are made of glass. Once dropped, Face ID is most likely to be unavailable.

In summary, Face ID can be easily damaged and hard to be restored. Therefore, please be very careful in daily use. Make sure the phone is protected from water-damage or heavy falling. Repair technicians must exercise caution when repairing the logic board or replacing the display assembly. Also, for those in need, we have summarized repair experience of Mobile King and hereby present you the following troubleshooting guide on common Face ID failure.
From time to time, after fixing the customers phone, the NFC or Apple Pay becomes malfunction.
Here’re the 3 most important things to check.
We are using an iPhone 12 Mini as demo.
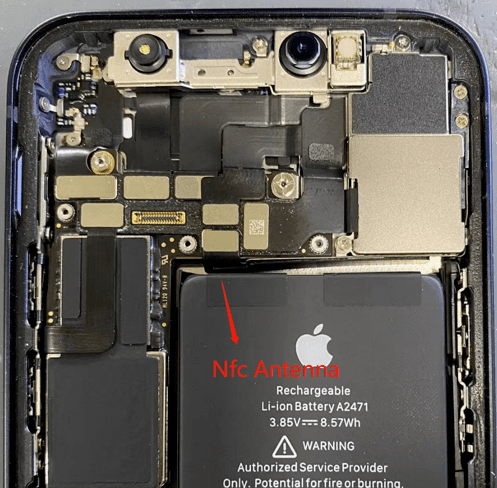
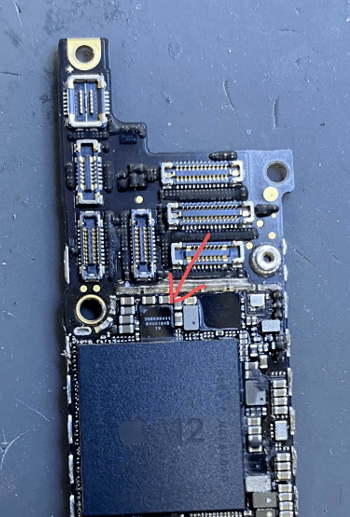
This is The NFC antenna, check if it’s broken or whether it’s connected properly.
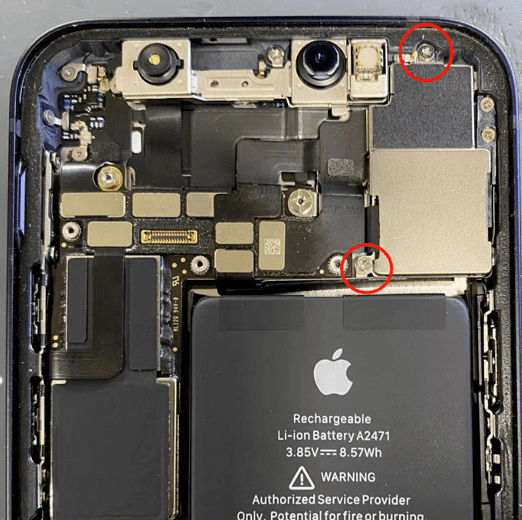
Check if any of the two screws are missing.
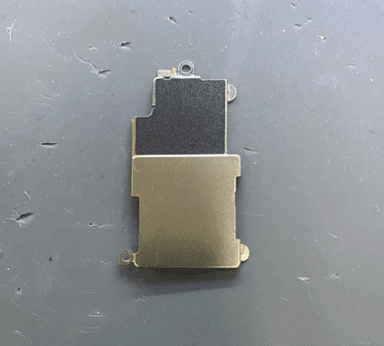
The NFC will not work with this metal plate even if the screws are in place.
Here we have compiled a list of common iTunes error codes, and the corresponding issues.
| Error Code | Failure Analysis |
|---|---|
| -1 | Baseband CPU, EEPROM |
| 1 | Baseband CPU |
| 6 | CPU, NAND, EEPROM |
| 7 | PD Fast Charging IC |
| 9 | NAND |
| 14 | EEPROM, NAND |
| 21 | RAM |
| 53 | Baseband, check PC network first |
| 56 | NFC |
| 2009 | Baseband, Use a different PC to restore first |
| 4005 | NAND, CPU |
| 4013 | NAND, RAM, i2c, check USB Cable first |
| 4014 | NAND, RAM, CPU, i2c |
| 4015 | RAM |
| 0xe8000068 | Check USB cable |
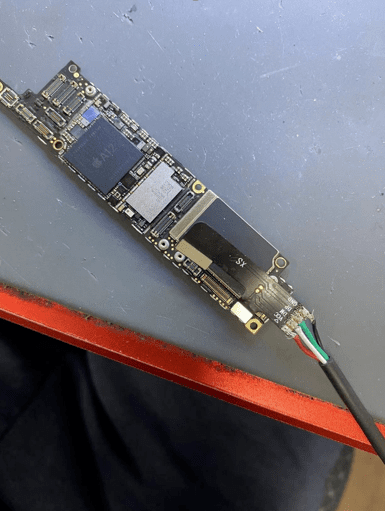
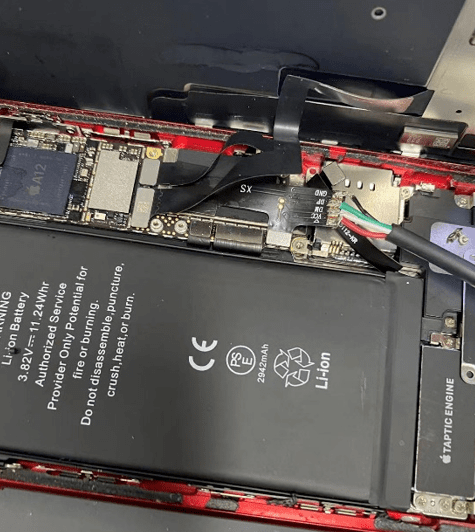
Step 1
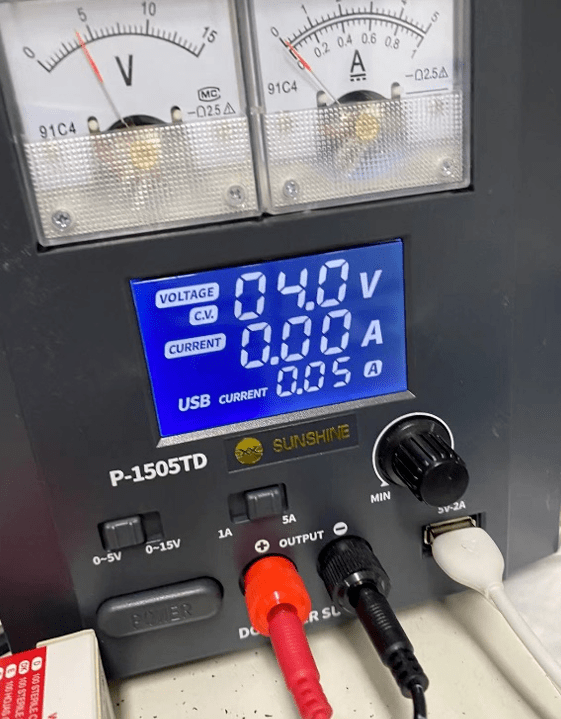
Connect mainboard to the power supply.

Step 2
Power supply reads 0.04A current going through the circuit.
It means some component on the circuit is shorted or there’s a power leakage somewhere on the board.
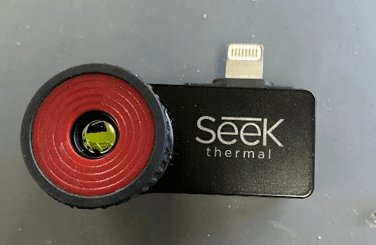
Step 3
We use this Seek thermal camera to scan the device for hot spot.
Plug it into an iPhone and open the app.
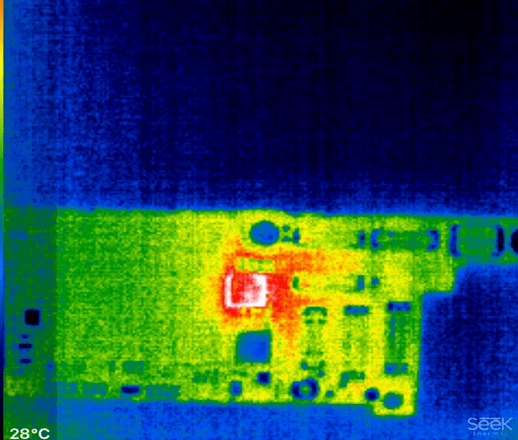
Step 4
It’s not too hard to spot the Audio IC is heated to 30 C Degree.
Step 5
Change IC to fix the issue.
Step 6
Hook the power supply back to motherboard and check.
Well played!
Case Study: When iPhone Restarts Randomly
If you got an iPhone booting up normally, but restarts say every 3 minutes, how do you debug it?
First, go check the panic report in
Settings -> Privacy -> Analytics & Improvements -> Analytics Data -> panic-full-(date).ips,
Then, open the report and read the “panicString”.
Example 1:
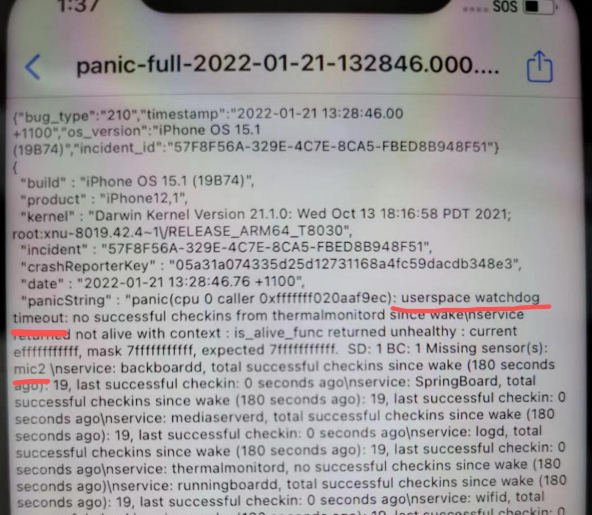
In the image above, it’s an “userspace watchdog timeout” error, and “missing sensor Mic2”. Refer to table provided on the left, you can find the cause is possibly microphone fault, so at the right column it tells which parts to replace to solve this issue.
It could be charging port, power flex, or battery being faulty, change them and if issue resolved.
Example 2:
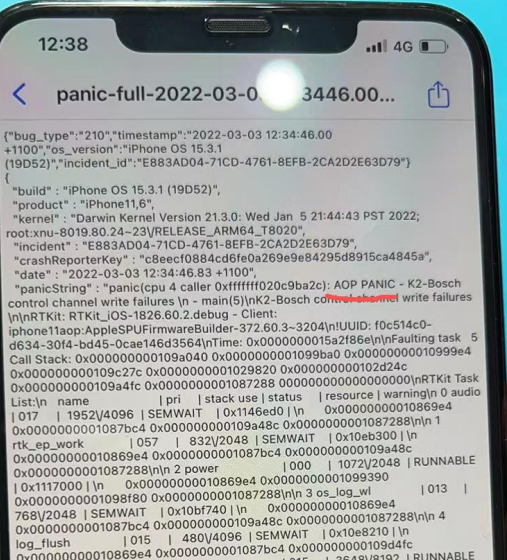
This one has a panicString of “AOP PANIC – K2 BOSCH CONTROL”.
Refer the the table, you can see it’s likely caused by faulty vibrator.
Replace the vibrator and test if the issue has been resolved.
| Panic String | Check Components |
|---|---|
| AOP PANIC k2- bosch control | VIBRATOR |
| Apple BCMWLAN | WIFI , BLUETOOTH |
| AOP DATA ABORT | CPU CONNECTION |
| Failed to stop GFX FW for GPU recovery | GPU , INDUCTOR , CPU DRY JOINT |
| AppleSocHot;Hot | Short Circuit Power Failure : CPU : motherboard |
| Attempting to forcibly halt CPU…cpu0 fail to halt | Short Circuit Power Failure : CPU : INDUCTOR |
| Anc-postnand.c1260vasser falled lind, ANS | NAND : MOTHERBOARD |
| Apple tristar2:could not find | Charging Flex , Tristar |
| Fimware fatal | IOS : MOTHERBOARD |
| eMemory apcie, apcie[0:s3e] | NAND : NAND PCIE LINE : CPU DRY JOINT |
| I2C0, I2C1, I2C2, I2C3 | I2c line |
| Radio on gated:baseband radio on sequence falled | Baseband |
| AOP PANIC – no pulse on | MIC : Check all audio related parts |
| SEP ROM boot panic | eeprom |
| Stacks+routined-date | For ipad long screw damage |
| AOP PANIC-……prox | Proximity Sensor |
| PMP NMI FIQ | CPU : PM IC |
| PC alignment exception from kernel | CPU : GPU |
| Kernel data abort | Fast charge ic , Cpu related data line |
| AGXG10P_B0 NMI | Motherboard ( mostly on iphone 8 ,8p X) |
| LLC, L2C | 24m Clock , CPU to GPU connection |
| nvme | NAND |
| Invalid kernel stack pointer(probable corruption) | CPU , GPU |
| SMC PREFETCH ABORT | Battery : Nand |
| Invalid mutex | Nand Data Corrupted |
| MBI queue | 6SP LCD |
| AppleHydra | Charging Flex |
| LSU error(Apple Fabric) on E-core | CPU ECORE Inductor |
| Sequencer Timeout | Audio IC |
| CS42L75 Audio | Audio IC |
| CS35L25Amp arc | ARC Audio |
| Spinlock timeout after ** ticks | IOS : NAND |
| Userspace watchdog timeout ( MIC 1 , MIC 2 , Prs0 , TG08 ) | BATTERY : CHARGING PORT : POWER FLEX |
| apcie[baseband] | BASEBAND |
| AppleMesaSEPDriver | FINGERPRINT SENSOR |
| apcie[wlan] | WIFI IC |
| GFX NMI | GPU : INDUCTOR : CPU DRY JOINT |
| AMCC error | CPU DRY JOINT |
| Accelerator | ACCELERATOR IC , NAND DATA |
| AppleBaseland | BASEBAND |
| FED err(…) on P-core | CPU P CORE INDUCTOR |
| No response to AP power notification in xxs | CPU INDUCTOR |
| AppleMaggieArcAudio | ARC AUDIO IC |